
March 23, 2016 NHTSA CAMPAIGN NUMBER: 16V166000
Automobile Jacking Plates may Loosen and Detach
If these jacking plates separate from the vehicle while driving, they may be a road hazard, potentially striking another vehicle, and increasing the risk of a crash.
NHTSA Campaign Number: 16V166
Manufacturer BUGATTI
Components STRUCTURE
Potential Number of Units Affected 87
Summary
Bugatti is recalling certain 2006-2010 Veyron vehicles manufactured March 10, 2006, to March 9, 2012, 2010-2012 Veyron Grand Sport vehicles manufactured September 29, 2009, to October 14, 2014, and 2011-2013 Veyron Super Sport vehicles manufactured February 18, 2011, to August 17, 2012. In the affected vehicles, the underbody aluminum reference plates used when lifting the vehicle may corrode and detach from the vehicle.
Remedy
Bugatti will notify owners, and dealers will rivet and seal the underbody aluminum reference plates, free of charge. The recall began on May 26, 2016. Owners may contact Bugatti at (805) 557-1050.
Notes
Owners may also contact the National Highway Traffic Safety Administration Vehicle Safety Hotline at 1-888-327-4236 (TTY 1-800-424-9153), or go to www.safercar.gov.
Technical Bulletin
16‐03‐003BUG
RPS Plate
Applicability:
Bugatti Veyron
Bugatti Grand Sport
Bugatti Super Sport
VIN range :
As per E573
Market Region:
All
Introduction:
RPS plates on the Monocoque chassis have to be secured with rivets
Description:
If the RPS plates of the Monocoque chassis are not riveted, check their position prior to securing them.
If the RPS plate of the Monocoque chassis is not present, a new RPS plate has to be installed
Warning:
If any doubt regarding this procedure, contact your Bugatti contact.
Do NOT drive/move or lift the car within 24h of the repair.
Procedure:
- Check that the RPS plate is not dislocated from the monocoque. The RPS plate must not move during the hand verification (Do Not use tools). If the RPS plate is not in place or is loose, see the RPS installation procedure below
- Mechanically clean the RPS plate and surrounding area as shown on Fig. 1

Fig 1: Mechanically cleaned RPS‐ Plate (Surrounding and bottom surface)
- Install the drilling gauge as shown on RPS installation drawing (Fig. 2), check the gauge position (Fig. 3‐5) prior to securing.
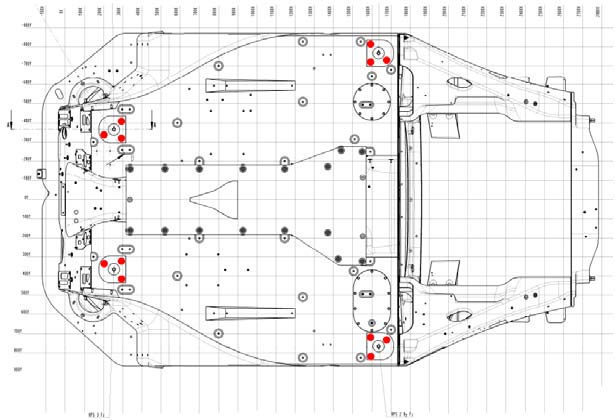
Fig 2: View from the bottom of the car, Schematic position of the fastening holes on all RPS
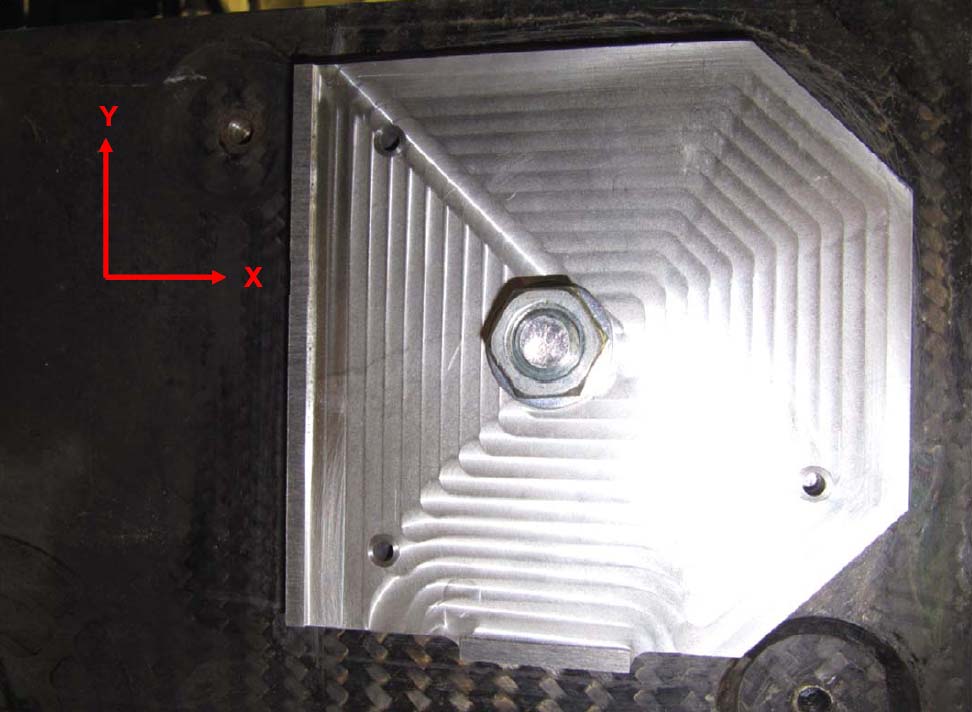
Fig 3: Installation position of the drilling gauge on the Monocoque
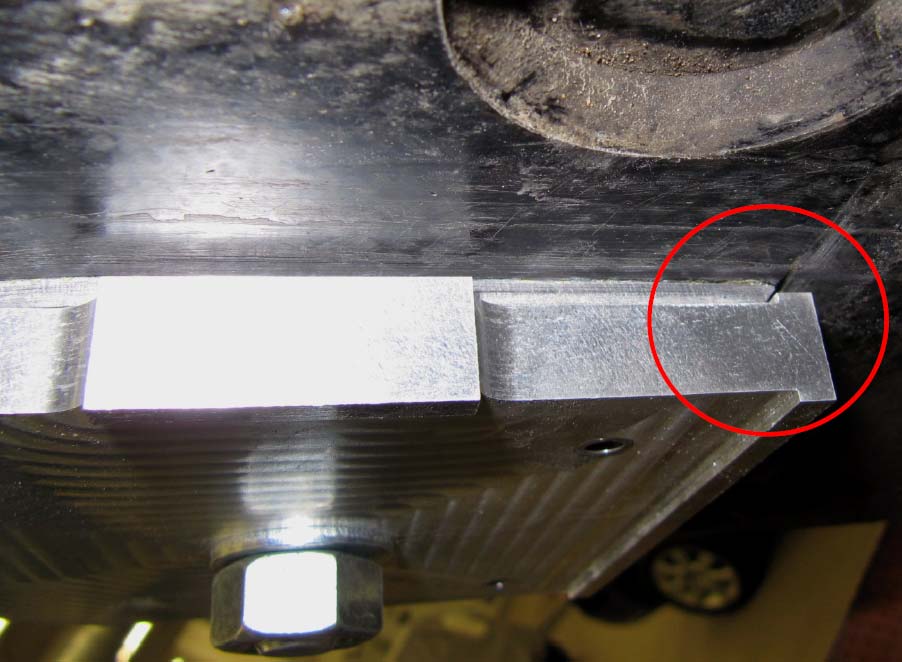
Fig 4: Installation position of the drilling gauge on the Monocoque with Detail X stop
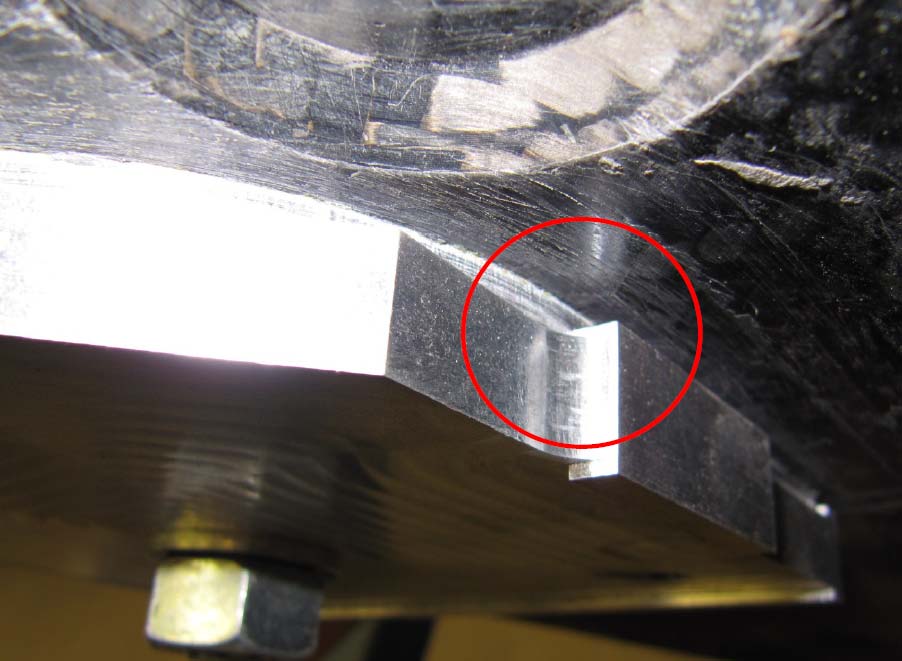
Fig 5: Installation position of the drilling gauge on the Monocoque with Detail Y stop
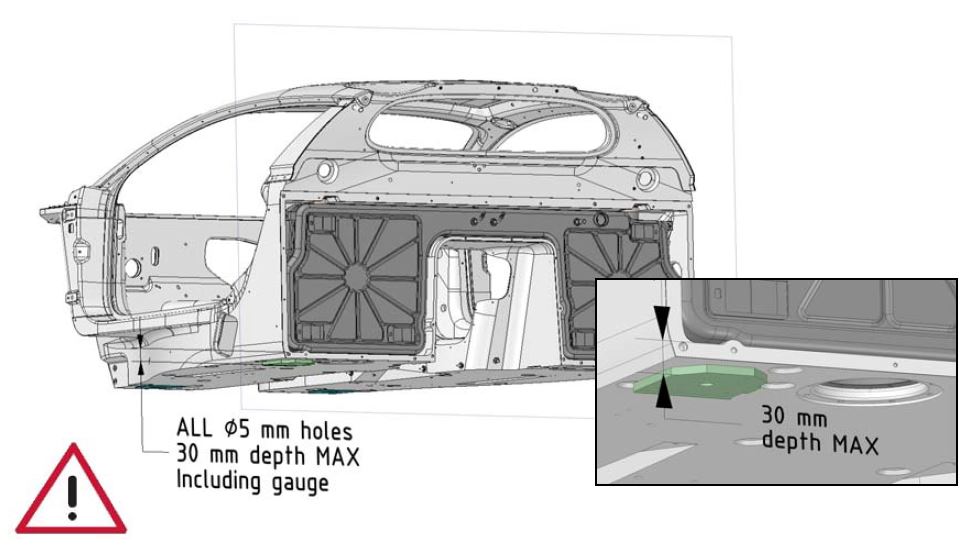
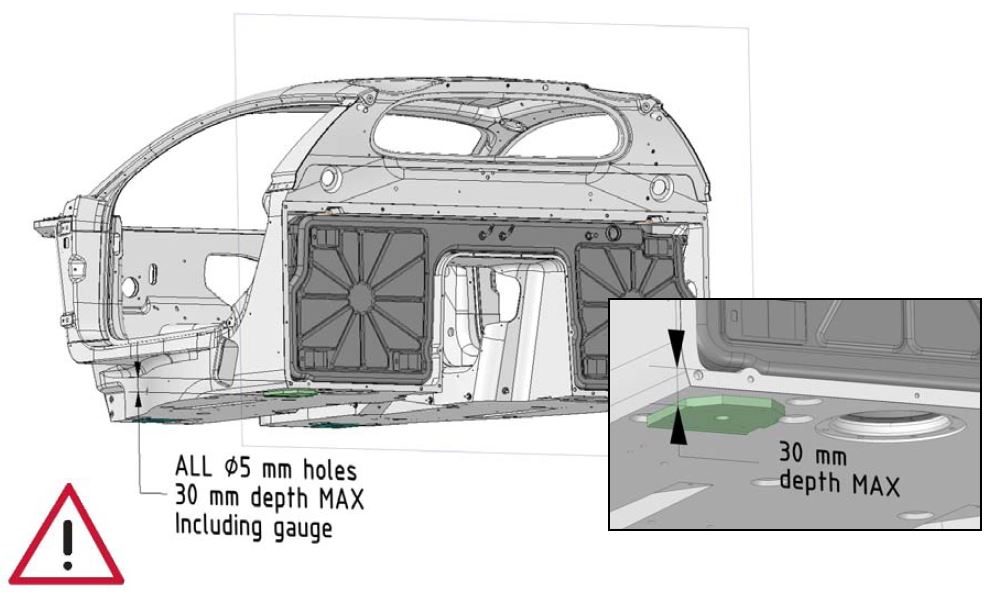
- Drill 3 holes dia. 5mm with max depth 30mm (including drilling gauge height) B. Monocoque or Fuel Tank could be damaged if not respected
- Remove drilling gauge and deburr holes (Fig.6(
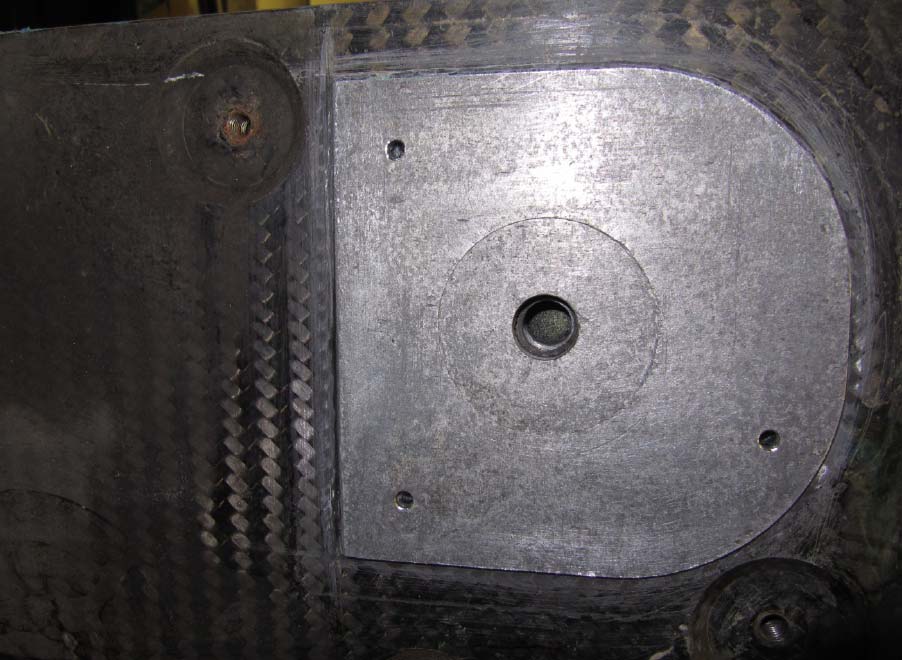
Fig 6: RPS‐Plate with the 3 drilled and deburred holes (Ø5,0mm)
- Install and expand the 3 blind rivets Typ: Monobolt 2774 ø 4,8 mm (aluminum) with EPDM seal (Fig. 7‐9)
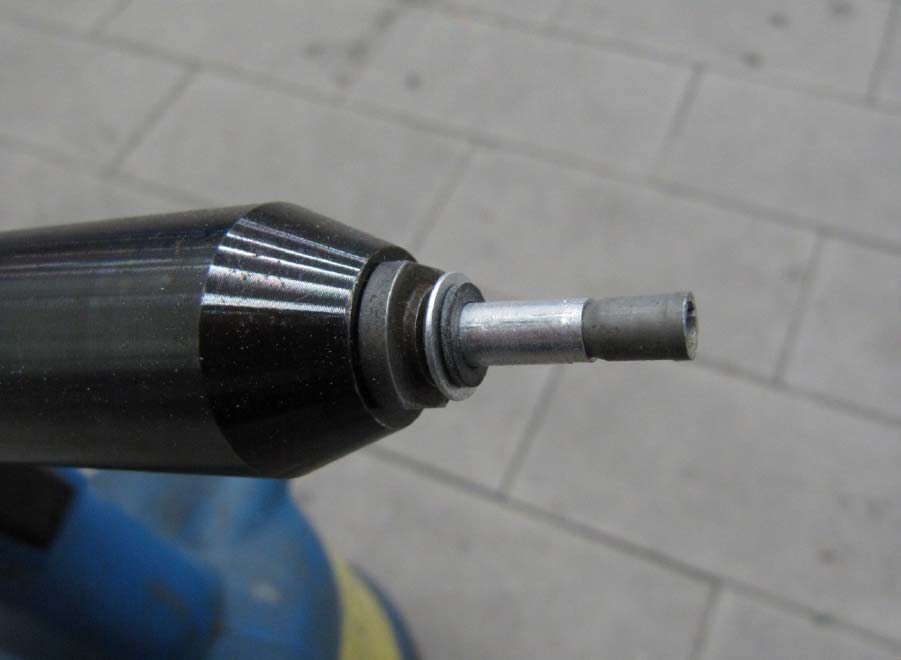
Fig 7: Avdel installation device Genesis nG3 with Monobolt Rivet 2774 with installed seal
Remark : Alternative installation device:
Pop Rivet Plilers V.A.G.‐ System Nr. VAS 1753 A with 72005‐02007 nozzle
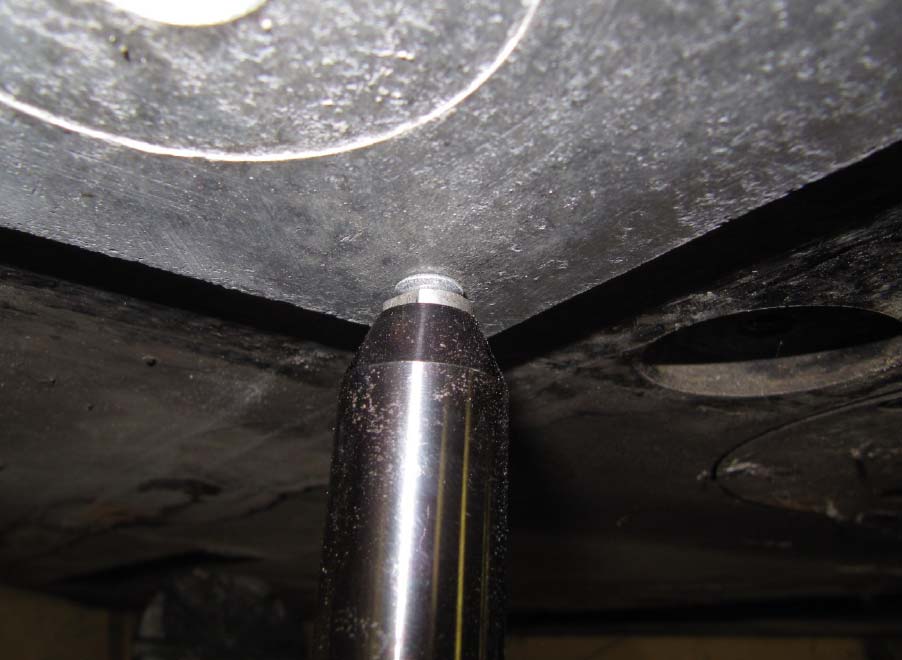
Fig 8: Installation of the blind rivet with the Avdel installation device Genesis nG3
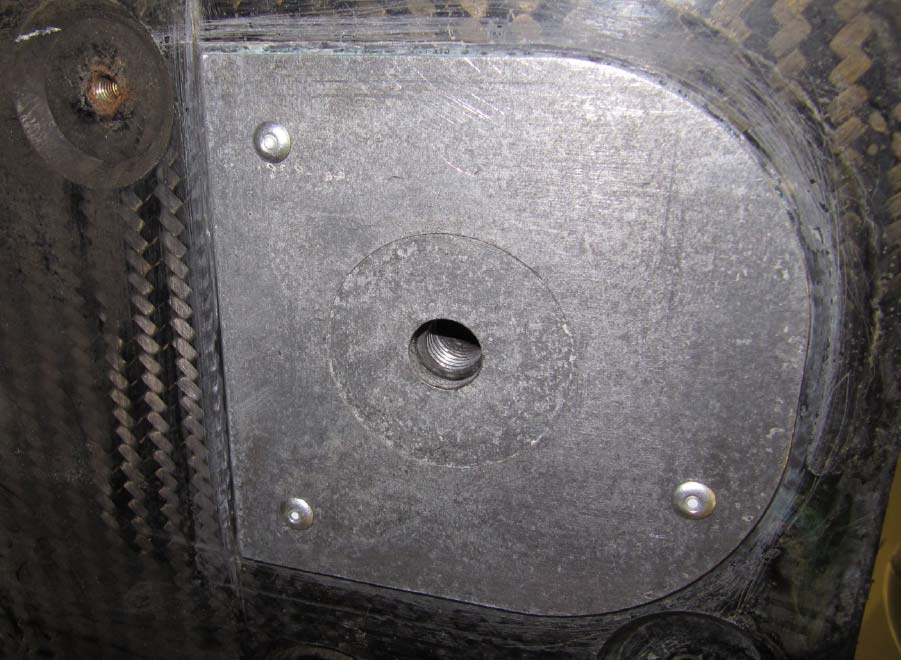
Fig 9: Riveted RPS Plate without surrounding seal
- Degrease the RPS plate surrounding with Brake Cleaner and let it dry for about 10 min
- Seal the RPS Plate surrounding with 3M Scotch‐Weld DP 490 (DA 001 730 A2) (Fig. 10‐11) with seal bead.
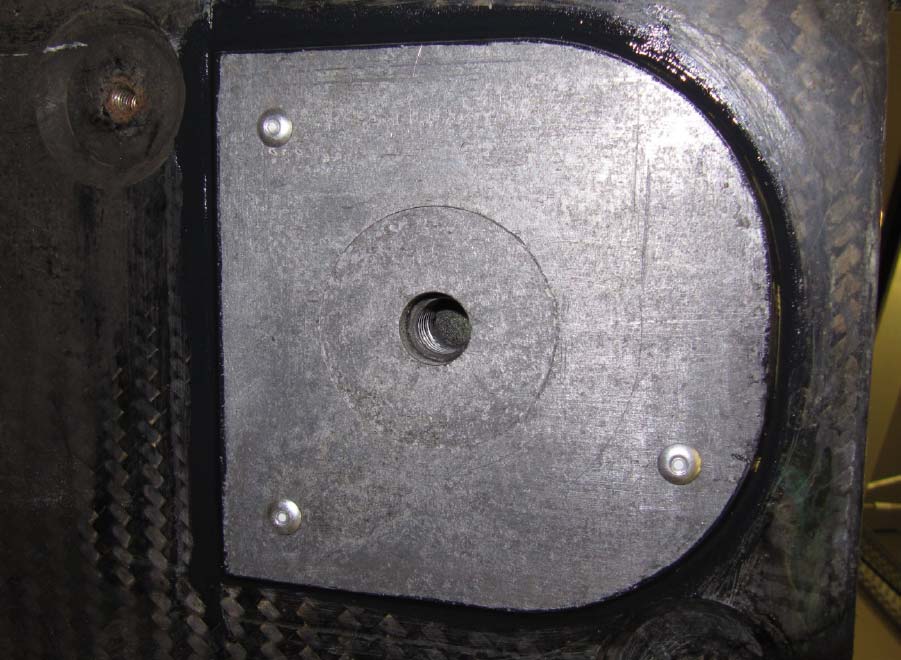
Fig 10: RPS Plate surrounding seal with Scotch‐Weld DP 490 (DA 001 730 A2)
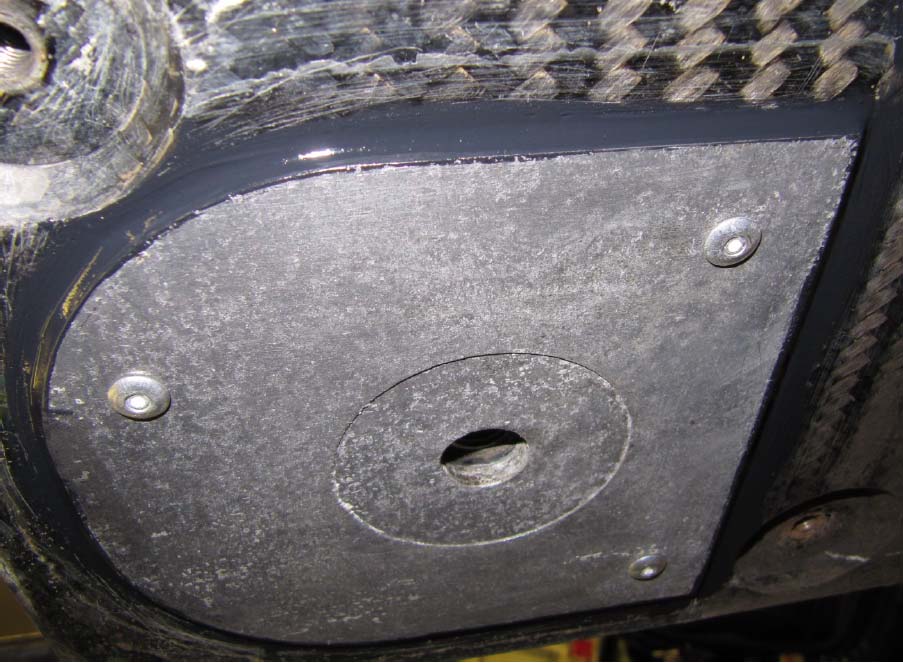
Fig 11: Detail view of the RPS Plate surrounding sealed with Scotch‐Weld DP 490
- Repeat sequence 1 to 8 for each RPS plates
- End of procedure
RPS Plate Re‐installation procedure:
- If the RPS Plate is loose, perform steps 2 to 5 of previous procedure
- Carefully remove the RPS plate, and mechanically clean contact surfaces between Monocoque and RPS plate with sandpaper grit 80 – 100
- Degrease the RPS plate and Monocoque RPS area with Brake Cleaner and let it dry for about 10 min
- Apply a thin film of the structural adhesive 3M Scotch‐Weld DP 490 (DA 001 730 A2) on the RPS Plate
- Install the RPS Plate on the Monocoque using drilling gauge installation bolt
- Install and expand the 3 blind rivets Typ: Monobolt 2774 ø 4,8 mm (aluminium) with EPDM seal (Fig. 7‐9)
- Remove drilling gauge installation bolt
- Seal the RPS Plate surrounding with 3M Scotch‐Weld DP 490 (DA 001 730 A2) (Fig. 10‐11) with seal bead.
- End of procedure
New RPS Plate installation procedure:
If the RPS Plate is not present on the vehicle, a measurement of the RPS insert has to be performed to select appropriate RPS Plate.
- Make sure the RPS tap is removed and clean the RPS insert with Brake Cleaner
- Use the depth probe of a Vernier calliper to measure the distance between the insert and the Monocoque Chassis
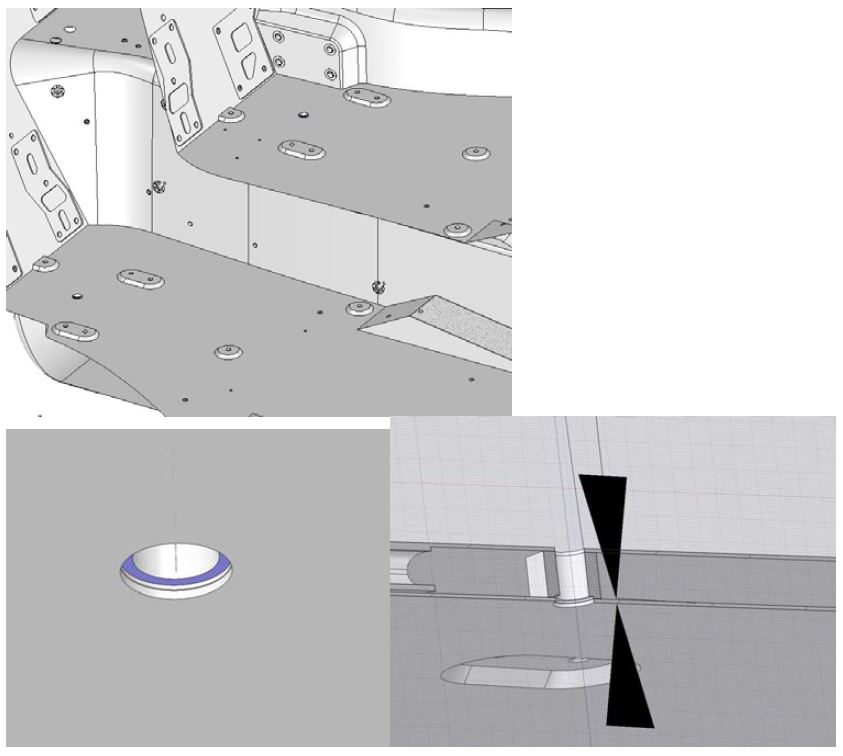
- Repeat the measurement for the four measurement points of each missing RPS plate.
Record the measurement values
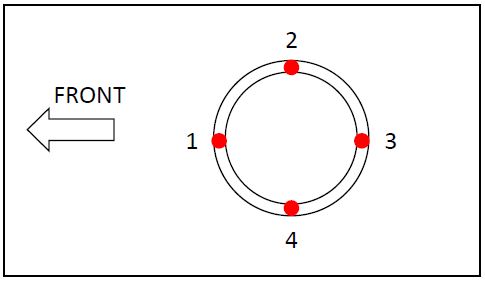
- Calculate the average of the 4 measurements , and define appropriate RPS plate according following table (to be confirmed according RPS plate)
| Average distance from Insert to Monocoque | RPS plate thickness to be used |
| 1,00 to 1,50 | 3,00 tbc |
| 1,51 to 2,00 | 2,50 tbc |
| 2,01 to 2,50 | 2,00 tbc |
| 2,51 to 3,00 | 1,50 tbc |
- Mechanically clean contact surfaces between Monocoque and RPS plate with sandpaper grit 80 – 100
- Install the selected RPS Plate on the Monocoque and the drilling gauge Drill 3 holes dia. 5mm with max depth 30mm (including drilling gauge height)
- Remove drilling gauge and deburr RPS Plate holes
- Degrease the RPS plate and Monocoque RPS area with Brake Cleaner and let it dry for about 10 min
- Apply a thin film of the structural adhesive 3M Scotch‐Weld DP 490 (DA 001 730 A2) on the selected RPS Plate
- Install the selected RPS Plate on the Monocoque using drilling gauge installation bolt
- Install and expand the 3 blind rivets Typ: Monobolt 2774 ø 4,8 mm (aluminium) with EPDM seal (Fig. 7‐9)
- Remove drilling gauge installation bolt
- Seal the RPS Plate surrounding with 3M Scotch‐Weld DP 490 (DA 001 730 A2) (Fig. 10‐11) with seal bead
- End of procedure
Chronology :
In September 2011 during endurance tests a car was found to have a missing plate.
Knock tests were carried out on other internal and field cars and identified the presence of split corrosion and delamination between aluminium plate and carbon fiber monocoq.
The analysis was conducted and concluded – in January 2012
The repair solution was available internally – in February 2012.
On 11 of March 2016 the matter was brought to the product safety committee and a defect determination was made.
11 Affected Products
Vehicles
| MAKE | MODEL | YEAR |
| BUGATTI | VEYRON | 2006-2010 |
| BUGATTI | VEYRON GRAND SPORT | 2010-2012 |
| BUGATTI | VEYRON SUPER SPORT | 2011-2013 |
13 Associated Documents
Remedy Instructions and TSB
RCRIT-16V166-5109.pdf 1074.295KB
Recall Quarterly Report – 2016 Q2
RCLQRT-16V166-4274.PDF 214.496KB
Defect 573 Report
RCLRPT-16V166-4494.PDF 30.544KB
Recall Quarterly Report #5, 2017-2
RCLQRT-16V166-6283.PDF 214.89KB
Recall Quarterly Report #3, 2016-4
RCLQRT-16V166-1302.PDF 214.688KB
Recall Quarterly Report #2, 2016-3
RCLQRT-16V166-3900.PDF 214.594KB
Recall Quarterly Report- Report #7, 2017-4
RCLQRT-16V166-5724.PDF 215.047KB
Recall Quarterly Report #6, 2017-3
RCLQRT-16V166-8707.PDF 214.968KB
Recall Quarterly Report #8, 2018-1
RCLQRT-16V166-5904.PDF 215.119KB
Recall Quarterly Report #11, 2018-4
RCLQRT-16V166-1759.PDF 211.983KB
Recall Quarterly Report #10, 2018-3
RCLQRT-16V166-4279.PDF 211.983KB
Recall Quarterly Report #9, 2018-2
RCLQRT-16V166-3818.PDF 215.195KB
Recall Quarterly Report #10, 2018-3
RCLQRT-16V166-1606.PDF 215.275KB
Latest Recalls Documents
- PREPS SURFACE: Pre-waxing glaze that prepares the surface for wax while offering deep reflections and high gloss.
- BEST CAR GLOSS: Conditioning oils add depth of color and maximum gloss prior to waxing, especially on dark colored cars
- REMOVE SWIRLS: Quickly and gently removes fine swirls and towel marks for mirror-like reflections
- SAFE FOR CLEAR COATS: Safe and on all glossy paints, including clear coats
- FLEXIBLE APPLICATION: Safe and effective by hand or dual action polisher like Meguiar's MT300 Dual Action Polisher


- BUFF OUT IMPERFECTIONS: Meguiar's Ultimate Compound removes scratches, swirls & oxidation for a clear, perfect finish
- SHOWROOM SHINE: Advanced car compound removes scratches, swirls, oxidation & water spots and restores color & clarity for a showroom shine in minutes
- CLEAR COAT SAFE: Auto compound safely removes scratches and other defects without hazing on clear coats & all gloss paints. Easy DIY fix by hand or da polisher
- LIKE-NEW SHINE: Meguiar's exclusive micro-abrasive technology quickly removes scratches & restores clarity and shine for a stunning, swirl-free finish.
- FAST & FLAWLESS: Meguiar's Ultimate Compound cuts fast, removes scratches and swirls without hazing, leaving a pro-detailer finish.

- One 16 oz bottle of Nu Finish The Once A Year Car Polish
- Automotive polish that is made up of a series of zinc cross-linking polymer emulsions that help it last longer than any other polish on the market
- Nu Finish car polish can be applied anywhere, even in direct sunlight
- Also an ideal boat polish, motorcycle polish and chrome polish
- The only auto polish tough enough to be called "The Once A Year Car Polish”

- EASY SCRATCH and SWIRL REPAIR - If your car has light scratches, swirls, or other marks - you can easily fix that with our Scratch & Swirl Remover Kit! Using the included buffer pad, our specially formulated compound will allow you to easily remove and "erase" years of wear and tear from your vehicles paint and overall appearance!
- ULTIMATE PAINT REPAIR- Not only will this remove swirls and scratches, it will restore the gloss and shine of your paint and bring it back to its original brilliance! The special rubbing compound will remove water spots, oxidation and other contaminants from your paint!
- PREMIUM CHEMICALS - We formulate all our products to ensure they are the best! Professional grade, but easy enough for anyone to use! We use only the absolute best chemicals and ensure there are no unnecessary color dyes or scents!
- ADVANCED SOLUTION FOR ALL PAINT TYPES - Car paint scratch repair is safe to use on all paints and colors. You can safely use it on any clearcoat, single stage, or multi stage paint!
- REVOLUTIONARY PRODUCT - This scratch remover for vehicles provides an effortless and secure way to remove scratches.

- [Gift for Detail-Oriented Car Lovers]: Nu Finish Once a Year Polish and Sealant - advanced ceramic technology that repairs, seals, and protects car's paint for an entire year with just one application
- REPAIRS SCRATCHES AND RENEWS SHINE: Long-lasting auto polish that helps repair fine swirls, scuffs and scratches while renewing the shine on paint and chrome, leaving a glossy, wet finish without any wax
- PREVENTS FUTURE SCRATCHES: Innovative Ceramic Technology forms an effective, durable protective barrier that helps prevent future scratches from forming and delivers extreme water beading for easier maintenance
- NO RUBBING OR BUFFING: Unique liquid polish that requires no rubbing or buffing and can even be applied in direct sunlight, unlike conventional car wax
- THE ONCE A YEAR CAR POLISH AND SEALANT: With just one application, you can polish and protect your car’s paint for an entire year* (*Based on U.S. average automatic car washes per year)
SEOCONTENT-START
Technical Bulletin 16‐03‐003BUG RPS Plate March 2016 Page 1 of 11 Issue 1 Applicability: Bugatti Veyron Bugatti Grand Sport Bugatti Super Sport VIN range : As per E573 Market Region: All Introduction: RPS plates on the Monocoque chassis have to be secured with rivets Description: If the RPS plates of the Monocoque chassis are not riveted, check their position prior to securing them. If the RPS plate of the Monocoque chassis is not present, a new RPS plate has to be installed Warning: If any doubt regarding this procedure, contact your Bugatti contact. Do NOT drive/move or lift the car within 24h of the repair. Technical Bulletin 16‐03‐003BUG RPS Plate March 2016 Page 2 of 11 Issue 1 Procedure: 1. Check that the RPS plate is not dislocated from the monocoque. The RPS plate must not move during the hand verification (Do Not use tools). If the RPS plate is not in place or is loose, see the RPS installation procedure below 2. Mechanically clean the RPS plate and surrounding area as shown on Fig. 1 Fig 1: Mechanically cleaned RPS‐ Plate (Surrounding and bottom surface) 3. Install the drilling gauge as shown on RPS installation drawing (Fig. 2), check the gauge position (Fig. 3‐5) prior to securing. Fig 2: View from the bottom of the car, Schematic position of the fastening holes on all RPS FRONT Technical Bulletin 16‐03‐003BUG RPS Plate March 2016 Page 3 of 11 Issue 1 Fig 3: Installation position of the drilling gauge on the Monocoque Fig 4: Installation position of the drilling gauge on the Monocoque with Detail X stop Technical Bulletin 16‐03‐003BUG RPS Plate March 2016 Page 4 of 11 Issue 1 Fig 5: Installation position of the drilling gauge on the Monocoque with Detail Y stop 4. Drill 3 holes dia. 5mm with max depth 30mm (including drilling gauge height) N.B. Monocoque or Fuel Tank could be damaged if not respected Technical Bulletin 16‐03‐003BUG RPS Plate March 2016 Page 5 of 11 Issue 1 5. Remove drilling gauge and deburr holes (Fig.6( Fig 6: RPS‐Plate with the 3 drilled and deburred holes (Ø5,0mm) 6. Install and expand the 3 blind rivets Typ: Monobolt 2774 ø 4,8 mm (aluminum) with EPDM seal (Fig. 7‐9) Fig 7: Avdel installation device Genesis nG3 with Monobolt Rivet 2774 with installed seal Remark : Alternative installation device: Pop Rivet Plilers V.A.G.‐ System Nr. VAS 1753 A with 72005‐02007 nozzle Nozzle Seal Rivet Technical Bulletin 16‐03‐003BUG RPS Plate March 2016 Page 6 of 11 Issue 1 Fig 8: Installation of the blind rivet with the Avdel installation device Genesis nG3 Fig 9: Riveted RPS Plate without surrounding seal 7. Degrease the RPS plate surrounding with Brake Cleaner and let it dry for about 10 min 8. Seal the RPS Plate surrounding with 3M Scotch‐Weld DP 490 (DA 001 730 A2) (Fig. 10‐11) with seal bead. Technical Bulletin 16‐03‐003BUG RPS Plate March 2016 Page 7 of 11 Issue 1 Fig 10: RPS Plate surrounding seal with Scotch‐Weld DP 490 (DA 001 730 A2) Fig 11: Detail view of the RPS Plate surrounding sealed with Scotch‐Weld DP 490 9. Repeat sequence 1 to 8 for each RPS plates 10. End of procedure Technical Bulletin 16‐03‐003BUG RPS Plate March 2016 Page 8 of 11 Issue 1 RPS Plate Re‐installation procedure: 1. If the RPS Plate is loose, perform steps 2 to 5 of previous procedure 2. Carefully remove the RPS plate, and mechanically clean contact surfaces between Monocoque and RPS plate with sandpaper grit 80 – 100 3. Degrease the RPS plate and Monocoque RPS area with Brake Cleaner and let it dry for about 10 min 4. Apply a thin film of the structural adhesive 3M Scotch‐Weld DP 490 (DA 001 730 A2) on the RPS Plate 5. Install the RPS Plate on the Monocoque using drilling gauge installation bolt 6. Install and expand the 3 blind rivets Typ: Monobolt 2774 ø 4,8 mm (aluminium) with EPDM seal (Fig. 7‐9) 7. Remove drilling gauge installation bolt 8. Seal the RPS Plate surrounding with 3M Scotch‐Weld DP 490 (DA 001 730 A2) (Fig. 10‐11) with seal bead. 9. End of procedure Technical Bulletin 16‐03‐003BUG RPS Plate March 2016 Page 9 of 11 Issue 1 1 2 3 4 FRONT New RPS Plate installation procedure: If the RPS Plate is not present on the vehicle, a measurement of the RPS insert has to be performed to select appropriate RPS Plate. 1. Make sure the RPS tap is removed and clean the RPS insert with Brake Cleaner 2. Use the depth probe of a Vernier calliper to measure the distance between the insert and the Monocoque Chassis 3. Repeat the measurement for the four measurement points of each missing RPS plate. Record the measurement values Technical Bulletin 16‐03‐003BUG RPS Plate March 2016 Page 10 of 11 Issue 1 4. Calculate the average of the 4 measurements , and define appropriate RPS plate according following table (to be confirmed according RPS plate) Average distance from Insert to Monocoque RPS plate thickness to be used 1,00 to 1,50 3,00 tbc 1,51 to 2,00 2,50 tbc 2,01 to 2,50 2,00 tbc 2,51 to 3,00 1,50 tbc 5. Mechanically clean contact surfaces between Monocoque and RPS plate with sandpaper grit 80 – 100 6. Install the selected RPS Plate on the Monocoque and the drilling gauge Drill 3 holes dia. 5mm with max depth 30mm (including drilling gauge height) 7. Remove drilling gauge and deburr RPS Plate holes 8. Degrease the RPS plate and Monocoque RPS area with Brake Cleaner and let it dry for about 10 min 9. Apply a thin film of the structural adhesive 3M Scotch‐Weld DP 490 (DA 001 730 A2) on the selected RPS Plate 10. Install the selected RPS Plate on the Monocoque using drilling gauge installation bolt 11. Install and expand the 3 blind rivets Typ: Monobolt 2774 ø 4,8 mm (aluminium) with EPDM seal (Fig. 7‐9) Technical Bulletin 16‐03‐003BUG RPS Plate March 2016 Page 11 of 11 Issue 1 12. Remove drilling gauge installation bolt 13. Seal the RPS Plate surrounding with 3M Scotch‐Weld DP 490 (DA 001 730 A2) (Fig. 10‐11) with seal bead 14. End of procedure Warranty information: Operation Defect Code Repair Code Time Repair if needed 2 hrs Bugatti Bulletins are intended for use by experienced and trained technicians. If you lack the skills, tools, equipment and a suitable workshop for any procedure described in this document, we suggest you leave such repairs to an Authorised Bugatti Dealer. See your Bugatti Dealer for advice on whether your vehicle may benefit from the information contained within this document. The information contained in this Bulletin is accurate at the date of publication. However, Bugatti Automobiles S.A.S. regularly updates technical information. Please check with your Bugatti Dealer that the Bulletin you intend to use contains the latest available information. Bugatti Automobiles S.A.S. All Rights Reserved
**************************************************************************************************************
OMB Control No.: 2127-0004 Part 573 Safety Recall Report 16V-166 The information contained in this report was submitted pursuant to 49 CFR §573 Manufacturer Name : BUGATTI Submission Date : MAR 22, 2016 NHTSA Recall No. : 16V-166 Manufacturer Recall No. : TBD Manufacturer Information : Manufacturer Name : BUGATTI Address : 1 CHATEAU ST JEAN DORLISHEIM, FRANCE 00 67120 Company phone : 999 Number of potentially involved : 87 Population : Estimated percentage with defect : 100 Vehicle Information : Vehicle : 2006-2010 Bugatti Veyron Vehicle Type : LIGHT VEHICLES Body Style : 2-DOOR Power Train : GAS Descriptive Information : Aluminium reference plate becoming loose Production Dates : MAR 10, 2006 – MAR 09, 2012 VIN (Vehicle Identification Number) Range Begin : VF9SA15B36M795001 End : VF9SC2C27AM795238 ✔ Not sequential VINs Vehicle : 2010-2012 Bugatti Veyron Grand Sport Vehicle Type : LIGHT VEHICLES Body Style : 2-DOOR Power Train : GAS Descriptive Information : Aluminium reference plate becoming loose Production Dates : SEP 29, 2009 – OCT 14, 2014 VIN (Vehicle Identification Number) Range Begin : VF9SK2C27AM795002 End : VF9SK2C28AM795302 ✔ Not sequential VINs Vehicle : 2011-2013 Bugatti Veyron Super Sport Vehicle Type : LIGHT VEHICLES Body Style : 2-DOOR Power Train : GAS Descriptive Information : Aluminium reference plate becoming loose Production Dates : FEB 18, 2011 – AUG 17, 2012 Part 573 Safety Recall Report 16V-166 Page 2 The information contained in this report was submitted pursuant to 49 CFR §573 VIN (Vehicle Identification Number) Range Begin : VF9SG2C21CM795002 End : VF9SG2C27DM795300 ✔ Not sequential VINs Description of Defect : Description of the Defect : Aluminium reference plate becoming loose FMVSS 1 :NR FMVSS 2 :NR Description of the Safety Risk : Aluminium plate could separate while driving and hit following traffic, causing a risk of accidents or personal injury. Description of the Cause : Split corrosion overtime between the aluminium and carbon monocoq could lead to separation. Identification of Any Warning that can Occur : none. Supplier Identification : Component Manufacturer Name : Bugatti Address : 1, Chateau St Jean Molsheim FOREIGN STATES 67120 Country : France Chronology : In September 2011 during endurance tests a car was found to have a missing plate. Knock tests were carried out on other internal and field cars and identified the presence of split corrosion and delamination between aluminium plate and carbon fiber monocoq. The analysis was conducted and concluded – in January 2012 The repair solution was available internally – in February 2012. On 11 of March 2016 the matter was brought to the product safety committee and a defect determination was made. Description of Remedy : Description of Remedy Program : Reference Plates will be inspected and replaced if necessary and all plates will be riveted and sealed to prevent corrosion. Bugatti will cover all the costs involved for the repairs. How Remedy Component Differs from Recalled Component : Presence of rivets and seal component on the RPS plate Identify How/When Recall Condition was Corrected in Production : First production car with modified Monocoq w27/2012 Part 573 Safety Recall Report 16V-166 Page 3 The information contained in this report was submitted pursuant to 49 CFR §573 Recall Schedule : Description of Recall Schedule : Dealer and Customer notifications : TBD Planned Dealer Notification Date : NR – NR Planned Owner Notification Date :NR – NR * NR – Not Reported
SEOCONTENT-END
This product presentation was made with AAWP plugin.